
Quality Highlights
| Every Seed Grows We don't pad bags with dead seed or filler. What's in the bag is what grows in your yard. | |
| Independently Tested, Every Batch Each lot is tested by a third-party lab for germination and purity before it ships to you. | |
| Grown on American Farms Our seed comes direct from U.S. growers we know personally — not a middleman warehouse. | |
| Clean Seed, No Shortcuts No coatings to inflate weight, no GMOs, no cheap filler species. Just seed. |
Free shipping on all orders under 125 lbs!
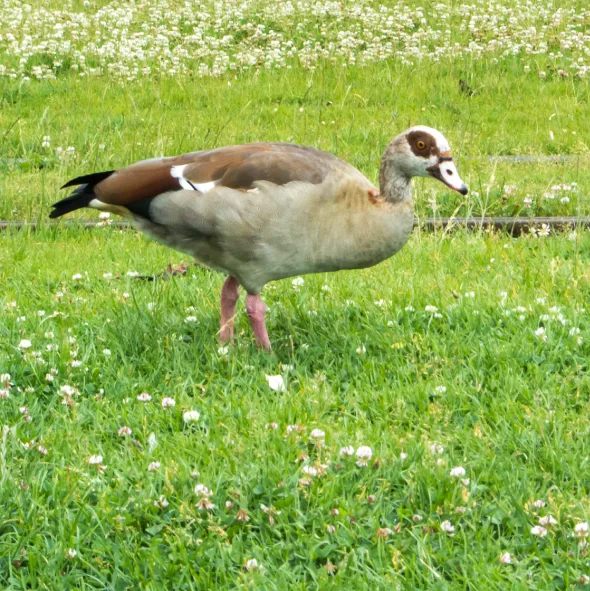
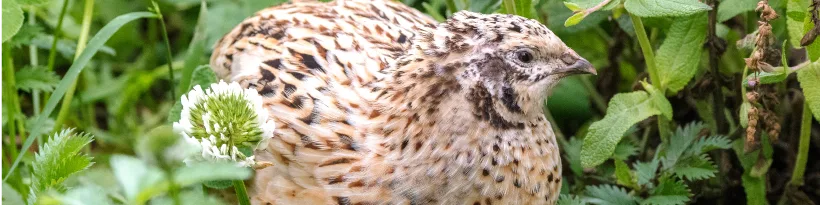
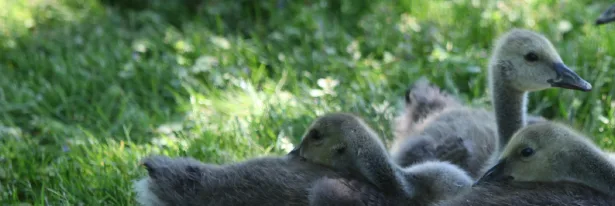
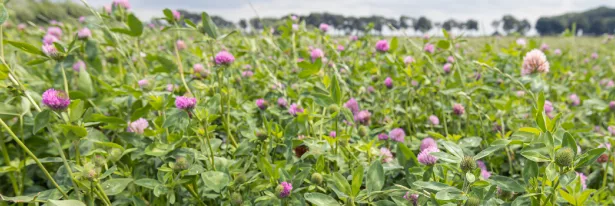
Pasture Clover Mix for Waterfowl Food Plots
SKU: PB-CLV
What is the Pasture Clover Mix for Duck/Quail Food Plot
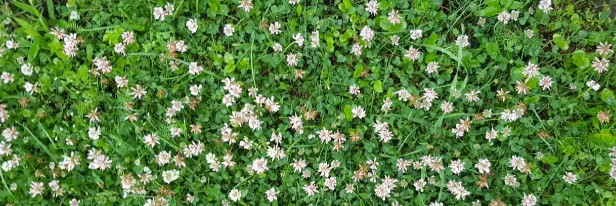
What's in This Mix
A low-growing, stoloniferous clover with high protein and excellent palatability for ducks and quail; it persists under close grazing, fixes nitrogen to improve overall sward quality, and helps provide continuous, easily accessible forage.
A quick-establishing, high-biomass variety that delivers abundant, high-protein spring and fall forage as well as seed and structure for cover; its deeper roots confer better drought tolerance and seasonal resilience in the plot.
Chosen for tolerance of cool, wet, or acidic soils and a longer forage/bloom window, helping to fill gaps when other clovers slow down; it provides palatable, digestible forage attractive to waterfowl and quail and supports pollinators for a more resilient mix.
Provides a high-protein, highly palatable forage that establishes quickly and fixes atmospheric nitrogen to improve soil fertility. Its low-growing habit tolerates close grazing and produces abundant seedheads that are attractive and nutritious to both ducks and quail.
Specifications
Seeding Specs
Establishment Specs
Why Choose This Seed?
Turn Wet Wasted Ground Into Birds
Those soggy corners that never stay dry usually end up as wasted space. Pasture Clover Mix is built for that kind of ground, turning wet, unplantable spots into thick, protein-rich forage that ducks and quail actually want to feed in—so birds spend time on your place instead of just cutting across it.
Let Your Food Plot Hunt For You
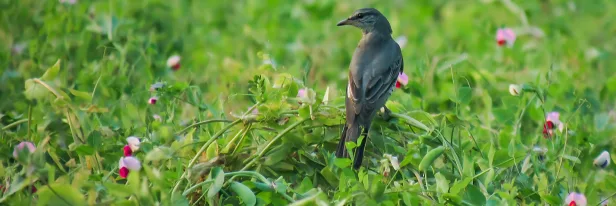
Your best hunts usually come from having a dependable food source in the birds’ normal travel pattern. With Pasture Clover Mix, you’re putting a tender, high-protein clover pasture right where ducks and quail already want to be, which helps keep them returning day after day and makes your hunts more consistent.
Keep Birds On Your Side Of The Fence
You do the work to plant and manage a plot—so it’s frustrating when the birds slide over to the neighbor’s spread. Pasture Clover Mix gives ducks and quail an easy, reliable place to feed and loaf on your side of the fence, keeping more birds in front of your gun and your dog instead of drifting off.
Turn Problem Spots Into Bird Magnets
Picture those low, wet pockets that drown out most plantings every year. Pasture Clover Mix thrives in areas like that and turns them into lush feeding zones that pull in and hold ducks and quail, so a problem spot becomes useful habitat—and another place birds want to spend time.
Pack More Birds Into Every Acre
Unlike a lot of mixes that look good on paper but don’t feed many birds, a strong clover pasture can carry real weight per acre. Pasture Clover Mix packs each square foot with rich, easy forage so ducks and quail don’t have to wander far, letting the acres you already own support more birds and better hunting without buying more land.
Planting Guide
Prepare the Soil
Pick low or wet areas that stay moist but are not under standing water for more than 2-3 days at a time during the growing season.
Choose spots where you can walk without sinking deeply; clover roots need both moisture and air.
Mow existing vegetation short or spray with a nonselective herbicide 2-3 weeks before planting.
Let the sprayed vegetation fully brown out before you work the ground.
Rake or drag off heavy thatch so you can see at least 5070% bare soil.
Disk, till, or drag lightly to break up the surface without creating deep ruts or holes.
Aim for a seedbed that looks like coarse crumbs, not powder and not big clods.
Avoid working the soil when it is muddy; wait until it is moist but not sticking heavily to your boots.
Test soil pH if you can; clover grows best at pH 6.0-7.0.
Apply lime several months before planting if pH is below 6.0; you will not see full benefit right away, but it sets you up for future seasons.
Apply phosphorus and potassium only as your soil test recommends.
Skip or minimize nitrogen fertilizer; nitrogen will push grasses and weeds instead of clover.
Firm the seedbed with a cultipacker, roller, or by driving over it with an ATV or tractor.
Check firmness by stepping on the soil; your boot heel should sink about 1/4-1/2 inch and no more.
Refirm any areas where your heel sinks deeper than 1/2 inch; loose soil will bury small clover seed too deep.
Stop working the soil once you see a mostly smooth, firm surface with small roughness to prevent washing.
Sow the Seeds
Plan to plant in early spring or in late summer/early fall when daytime temperatures are mild and soil stays moist.
Avoid planting right before a hard freeze, extreme heat, or heavy flooding.
Measure your plot size as accurately as possible so you can apply the right amount of seed per acre.
Use about 6-10 pounds of this pasture clover mix per acre if you are drilling the seed.
Use about 8-12 pounds per acre if you are broadcasting the seed on top of the soil.
Mix the seed with a carrier such as pelletized lime or clean, dry sand if broadcasting so it flows evenly through your spreader.
Set your ATV or tractor spreader to a low opening and make multiple passes rather than trying to spread all the seed in one pass.
Spread seed on a calm day to prevent wind from blowing seed off target.
Overlap your passes slightly so you do not leave bare stripes; you should not see obvious unseeded streaks when you are done.
Avoid driving through standing water; focus on wet swales, levees, pond margins, and exposed damp soil.
Do not spread seed directly into water; clover will not establish under standing water.
In shallow impoundments, seed on exposed mudflats when they are just firm enough to walk on without sinking deeply.
Plan to let water rise slowly later in the season after the clover is established.
After seeding, lightly cultipack or roll the area to press seed into the top 1/8-1/4 inch of soil.
Check depth by scraping the surface; you should see seed just under or right at the soil surface, not buried deeper than 1/4 inch.
Avoid dragging with aggressive harrows after seeding; this often buries clover seed too deep and reduces emergence.
Establishment
Keep the seedbed consistently moist but not under continuous standing water during the first 4-6 weeks after planting.
If you control water levels, keep new plantings mostly dry or with very shallow water (less than 1-2 inches) during this period.
Check the soil every few days in the first 2 weeks; it should feel damp when you press it but not soupy.
Expect clover seedlings to start appearing within 7-1-4 days in good conditions.
Look for small, twoleaf seedlings evenly scattered across the plot; this tells you you have a good stand starting.
Avoid driving ATVs, trucks, or running livestock across the plot during the first 4-6 weeks.
Stay off especially soft or wet areas; tire ruts and hoof prints can crush young plants and compact the soil.
Watch for weeds starting to outgrow the clover in the first month.
Wait until the clover is 4-6 inches tall before mowing any weeds.
Set your mower high enough to just clip the tops of the weeds and leave most clover leaves intact; usually this means mowing to about 6 inches.
Do not scalp or cut into the clover crown; if you see a lot of bare soil after mowing, your mower is set too low.
Avoid applying nitrogen fertilizer during this establishment period; it will push weeds and grasses.
By 4-6 weeks, aim for clover 3-4 inches tall and covering most of the soil surface.
Once the stand is 6-8 inches tall and looks thick and even, begin introducing shallow flooding in nearby or lower zones if desired for ducks.
Keep at least part of the clover area on slightly higher ground out of prolonged water so the stand survives long term.
Maintenance Long Term
Manage water so clover plots stay moist or shallowly flooded in cool seasons but are not under deep, continuous water during the main growing months.
Avoid holding more than a few inches of water over clover for long periods; extended deep flooding will thin or kill the stand.
Walk the plot several times each growing season and look for thin or bare spots.
Overseed thin areas in late winter or early spring at 35 pounds of clover mix per acre onto a firm surface.
Cultipack or roll after overseeding so seed makes good contact with the soil.
Mow the plot once or twice a year to a 6-8 inch height to control weeds and stimulate fresh clover growth.
Time mowing after clover has grown up and before weeds go to seed; this keeps the stand cleaner.
If you use livestock, graze lightly and briefly, and remove animals before they graze clover below about 4 inches.
Test soil every 2-3 years and apply lime as needed to keep pH between 6.0 and 7.0.
Apply a lownitrogen fertilizer with higher phosphorus and potassium only as your soil test recommends.
Avoid routine nitrogen applications; if you see grasses taking over, you are likely using too much nitrogen.
Watch for invading grasses, sedges, or woody brush throughout the year.
Spotmow, spotspray, or lightly disk narrow strips where these plants start to dominate.
Leave most of the clover area undisturbed when you treat problem spots so birds always have cover and food.
Rotate or rest sections of the plot some years by reducing mowing or grazing pressure to let clover flower and drop seed.
Adjust water drawdowns in some years to expose soil and encourage natural clover reseeding.
You will know your management is working when you see a mostly solid clover cover 6-10 inches tall with few tall weeds and regular bird use.
Helpful Resources
Attract Gobblers with Turkey Food Plots
The Importance of Legumes in Pastures
Questions & Answers
The best option is a wet-tolerant, multi-species pasture clover mix thats made specifically for ducks and quail, like our Pasture Clover Mix for Duck/Quail Food Plot. Its designed to handle moist, low-lying soils and still grow thick, leafy forage that ducks love to feed in and quail use for cover. For best results, plant it in full sun to partial shade, keep the seed shallow (just pressed into the top of the soil), and make sure the soil is firm so the seed can touch soil well. Set up this way, you can expect a reliable, long-lasting food and cover source in your wet areas.
To get a thick clover plot, start by clearing weeds and creating a firm, smooth seedbed, then lightly till or drag the top couple of inches of soil. Broadcast the clover seed at the recommended rate, then use a roller or cultipacker to press the seed into the top 1/4 inch of soil without covering it too deep. Focus on low, moist spots near ponds or wetlands, and try to plant just before a rain so the seed has good moisture to sprout. If you keep weeds under control the first season, you’ll end up with a dense, high-protein plot that draws in ducks and quail consistently.
The best time to seed a clover food plot is early spring or late summer/early fall, when temperatures are mild and theres usually more natural moisture. In most areas, that means planting around MarchApril or AugustSeptember, and avoiding the hottest, driest part of summer. Try to plant into a firm, weed-free seedbed and time your seeding just before a good rain so the seed can germinate quickly. Planting in these windows helps the clover root deeply, fill in thick, and be ready when ducks and upland birds are most active on your property.
For a duck and quail food plot, plan on using about 6-10 pounds of clover mix per acre if you’re drilling the seed, and 8-12 pounds per acre if you’re broadcasting it on top of the soil. Use the higher end of the range if your seedbed is a little rough or you’re worried about uneven spreading. No matter how you plant, make sure the soil is firm, mostly weed-free, and that you press the seed into the surface so it makes good contact with the soil. Following these rates will help you get a thick, healthy stand that feeds birds and holds them on your property.
Yes, a well-planted pasture clover mix will usually attract more ducks and quail than just relying on native vegetation. Clover gives birds a steady, high-quality food source and good cover in one spot, so they’re more likely to stay on your property instead of just passing through. To get the most benefit, plant it in open areas near water, control weeds, and mow or lightly graze as needed to keep the clover fresh and leafy. With basic care, you should see more frequent and longer visits from both ducks and quail.
You can plant this Pasture Clover Mix in low, moist fields and along pond edges, and it won’t drown out as long as the area isn’t under water for long periods. This mix is bred to handle wet soils and occasional flooding better than standard clovers, which makes it ideal for wet spots where ducks and quail like to be. Aim for areas that get soggy or briefly flood but then drain back down, rather than spots that stay under standing water. If you choose those areas and prepare the soil well, you can expect a strong stand that feeds ducks and provides great cover and bug habitat for quail.
Still Have Questions?
Our seed experts are ready to help you find the perfect seed for your project.
1-866-322-7300 Ask a Seed ExpertCustomer Reviews
See what real customers are saying. All reviews are collected and verified by Shopper Approved, an independent third party.
