The DIY Guide to Lawn Aeration: How and When to Aerate Your Yard
Many homeowners in the U.S. are handy with their lawns. They’re willing to put the time and effort into maintaining a lush, green front- and backyard. 81% are happy to DIY care for their lawns, and 68% feel confident in their lawn care knowledge.
Yet, many homeowners don’t know the difference between de-thatching their lawns and aerating it. 31% of these same homeowners don’t know how to grow a healthy lawn, and 69% admit their lawn could use improvement, despite their willingness to put in the work.
So let’s demystify lawn care — starting with aeration, which is an essential part of lawn care treatment. The fact is that you can aerate your own lawn, but only if you know what to do, how to do it, which tools to use, and, most importantly, when during the year aeration serves your soil best.
What is Lawn Aeration?
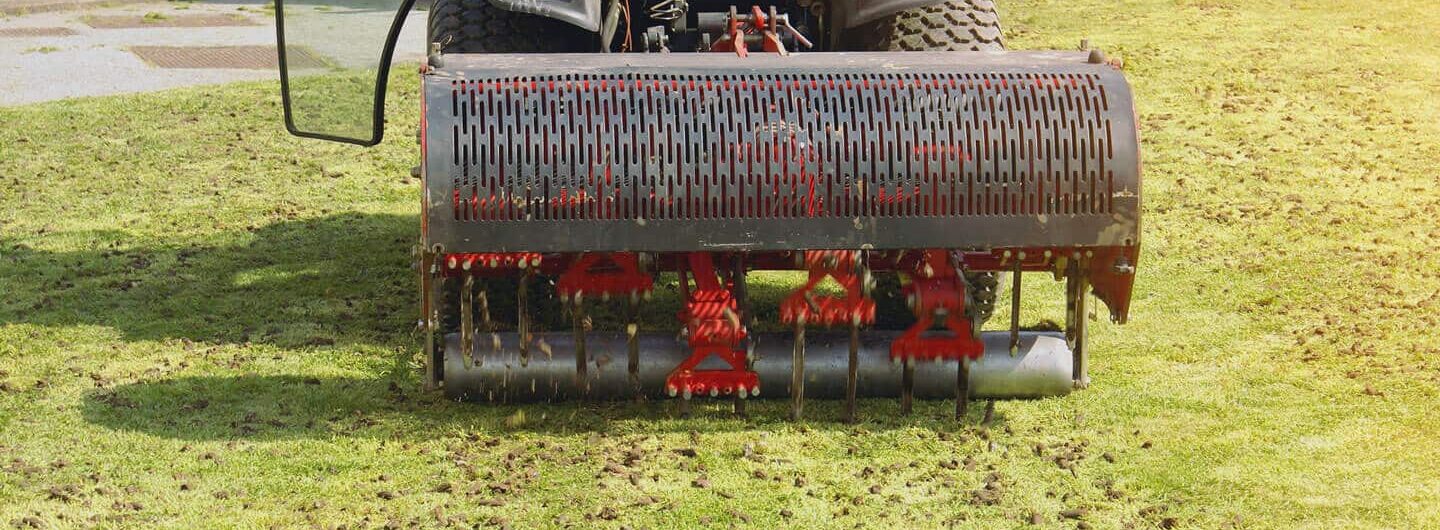
Lawn aeration is the process of perforating your lawn to a depth of between two to four inches deep. Some lawns, like those on putting greens, will need to be plugged up to 10 inches. The little cylinders or “plugs” are compacted pieces of soil that an aerator tool pulls out. This is part of the process of aerating your lawn.

The goals of lawn aeration are simple:
- High traffic use and weather conditions can compact your soil every year, making it hard for much-needed nutrients, air, and water to reach the roots.
- Aerations help eliminate excessive lawn thatch and organic debris buried under the grass surface because you have to prep the grass for aeration.
- Through the holes, air, water, and nutrients can penetrate to the roots, ensuring a healthy, thatch-free lawn, supported by good quality soil.
Signs You Need to Aerate Your Lawn
Heads up: not every lawn needs aeration. Newly planted lawns, for example, need time to establish, so they don’t need lawn service. However, there are some unmistakable signs your lawn needs aeration.
These include:
- Pools of water collecting on the lawn after rainfall
- Your kids and pets have been running on it all spring and summer long
- This is a new home construction (the topsoil on newly constructed lawns are stripped and then compacted because of construction traffic)
- Has a spongy feel and dries out easily
- Established by sod, rather than grass seed, and comes with a fine texture of soil layer that then disrupts drainage
- Thatch one and a half-inch thick overlaying grass
- You have heavy clay soil
- Some parts of your lawn are thin, patchy, or bare
- Thick outcroppings of clover
Even if none of these signs apply, you can perform a simple aeration test to check for compacted soil.
How to Perform a Soil Aeration Test
Assess your grass’s health by pushing a screwdriver or pencil all the way into the soil. Choose a spot that has slightly moist soil. Compacted soil will be difficult to drive straight into. That’s your first sign.
Next, to confirm compaction, excavate about a square foot of turf, with soil, using a shovel. If you’re unable to sink the shovel to a depth of half the blade, you’re dealing with compacted soil.
Once you do dig up the grass and soil combo, look for thatch and examine the roots. If you see A chaotic weave of living and dead organic material more than one-half inch thick sitting between the living grass blades and excavated soil is grounds for aeration.
Finally, examine the grass roots — they should be at least four to six inches deep. Anything less than that, and it’s time to aerate your lawn.
The Benefits of Lawn Aeration for Your Yard
Aerating your lawn has verifiable benefits. Once light, air, and water can get through, you’ll see an improved physical profile for your lawn and the soil underneath.
These include:
- Improved permeability of the lawn (useful for fertilizers)
- Improved drainage, which reduces root fungus
- Better microbial health, which is important for soil nutrition and root growth
- Roots with greater depth and new growth
- A reduced buildup of thatch and improved uptake of nutrients
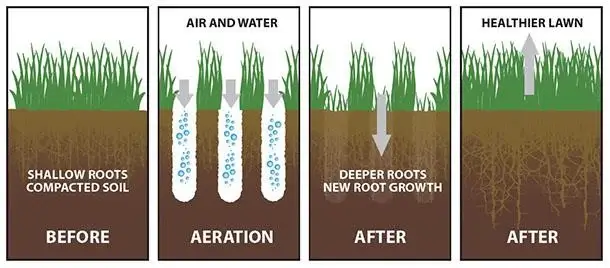
As far as lawn care practices go, aeration can be preventative rather than prescriptive. If you use the core aerator technique, you’ll also be able to fertilize and overseed with great effectiveness.
Everything You Need to Know About Aeration Tools
Aerating your own lawn is quite doable, but you’ll need to be prepared with the right tools. Which method and tool you use also depends on the level of compaction your soil is facing.
Sometimes, there may be so much thatch or such a high level of compaction that only the most professional or tools will suffice — and that’s when you have to hire a lawn service company.
Aeration Methods
There are a couple of methods you can rely on to aerate your lawn.
Spike Aeration
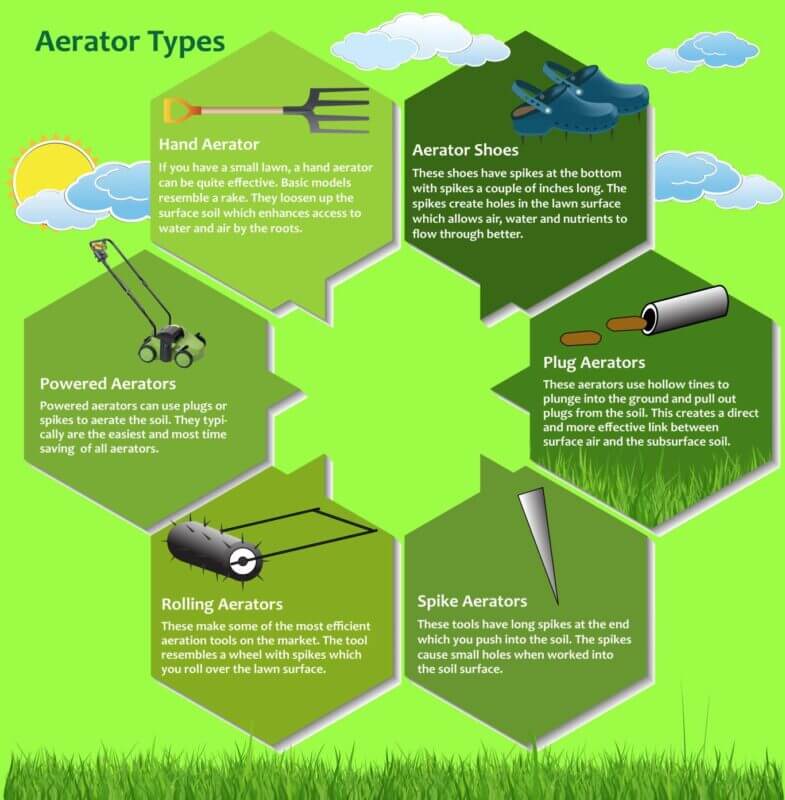
Spike aeration is a widespread and cost-effective method for aerating your grass. Much like garden forks, these tools puncture your grass, create small, but deep, holes, and allow the soil to “breathe” once more.
Plug Aeration
Also known as core aeration, this method involves pulling out cylindrical shaped plugs that consist of soil, thatch, and grass on top. They’re usually up to three inches deep and anywhere from 0.5 to 0.75 inches in diameter, set two to three inches apart.
If you think about coring an apple, this is exactly what’s going on with your lawn when you use plug aeration. The holes are a lot bigger than what a spike could make, so there’s a better chance for water, light, and air to get in. With plug or core aeration, the action you’re taking is pulling up and out, rather than pushing down and into the soil.
Aerator Tools You Can Use
There are a variety of aerator tools you can use for DIY aeration.
Aerator Shoes
First up are aerator shoes. They look like Crocs, but they have sharp, deep spikes embedded in the sole so you can essentially walk across your lawn while performing aeration along the way. Handy, but not as effective as core aeration.
Long-Handled Fork Aerators
Fork aerators favor the spike method, but you can opt for a three-prong coring aerator instead. These are manual and a great alternative to mechanical or motorized aerators.
Motorized Mechanical Aerators
Mechanical aerators are very easy to operate, and the price tag reflects this convenience. You simply push these units like a lawnmower, and they easily core the lawn.
There are two types:
- Drum-type motorized aerators, good for fixed hole patterns
- Cam units, which penetrate the soil deeper
Tow-Behind Aerators
Also known as a rolling aerator, tow-behinds are for use on large tracts of land. You can attach them to mowers or lawn tractors and simply pull them along to penetrate the soil.
Tow-behinds come in spike v.s. core models. Keep in mind that the plug option takes more horsepower to run because you’re pulling up.
When Should I Aerate My Lawn?
The best time to aerate your lawn depends on a few factors:
- Weather conditions (after rainfall is best)
- Whether your lawn is newly-planted or not
- Time of year
- What type of grass you have
For Warm-Season Grasses
The active growth season for warm-season grasses is from May to September. Late spring or summer is just fine as well.
This applies to turfgrass species such as:
- Bermudagrass
- Zoysiagrass
- St. Augustine
- Centipede grass
For Cool-Season Grasses
Anytime during early spring and fall is the best time for aerating cool-season grasses. That means anytime between September to November and March through April. If you miss the frost mark in the fall, plan to aerate later in the morning.
This applies to varieties such as:
- Tall fescues
- Fine fescues
- Ryegrass
- Kentucky Bluegrass
Your lawn should be moist but not waterlogged. Make sure, however, that you do not aerate during high heat or a dry spell. This will further damage and erode the soil.
Follow these tips for cues on when to aerate:
- Aerate before fertilizing or reseeding because these are perfect post-aeration treatments
- De-weed your lawn before aerating as the process can help spread weed seeds or parts of a weed’s roots.
- If there’s no rainfall in the forecast, water your lawn for up to one hour one day before aerating. However, this depends on your soil’s state. If it’s harder, plan for shorter times several days before aeration.
A Four-Step Guide On How to Aerate Your Lawn
Step #1: Prep Your Lawn
Rarely is your lawn aeration-ready. Here’s what you need to do to prepare the area:
- Begin by de-weeding the entire lawn.
- Next, mow your lawn down to a healthy height. Do some de-thatching if you need it.
- Mow your lawn once more, and then collect any grass clippings to keep the surface organic-matter-free.
- Water your ground for about an hour, either the evening before or the morning of.
Step #2: Assess the Areas and Mark Them Off
The ground is all prepped and ready to go. Now it’s time to examine and plan. If you’re using a core aerating tool, it’s best to mark off the right areas, so you’re not wasting time and energy.
Here’s how it works:
- Begin by using small flags to mark sprinkler heads, septic lines, buried utilities, and even shallow irrigation lines
- Examine the ground and mark of shallow versus hard compacted soil. Shallow areas only need one pass, done in a mowing pattern. Highly compacted soil, however, needs multiple passes. Use a mowing pattern for the first round, and set the aerator at an angle during the second round.
Step #3: Ready, Set, Aerate
All that’s left now is for you to aerate! Take your time and follow the marks you made before.
Step #4: TLC and Aftercare for Aerated Lawns
When you’re done, the bulk of the work is over. Now it’s time for some TLC for your lawn.
- Leave soil plugs in place to decompose
- Fertilize and seed lawns right after aerating. You can also add a thin layer of soil or composted manure
- Heavily compacted soils may need one-quarter of an inch of compost. Rake the matter in so it falls into the holes.
- Cool-season grasses will need an application of natural herbicide in the spring, after fall aeration. Warm-season lawns call for herbicide in the fall after aerating.
Conclusion
Aerating your lawn is highly beneficial for the aesthetic beauty of your home. But this treatment also contributes to your soil’s overall well-being, which is itself a part of a healthy soil profile in your community.
At Nature’s Seed, we’re passionate about natural, sustainable methodologies for improving every aspect of your property. From preventing erosion using strategic grass seed planting, planting for pollinators, and supporting rejuvenation and revitalization projects in your community, Nature’s Seed is your partner in a thriving outdoor environment. Call us or contact our team to learn more about our best lawn care recommendations.
